
Outdoor Balloon Arch Installation Tips: A Weather-Ready Setup Guide
Last Updated: November 4, 2026
Quick Summary
To install an outdoor balloon arch, start with a rigid metal or fiberglass frame and heavy weighted bases, then anchor each leg to match the surface: stakes in grass, sandbags on concrete and decking. Check the hourly forecast and treat sustained wind above 15 mph as the point where a large outdoor balloon arch needs full reinforcement or postponement.
- Use a rigid metal or fiberglass frame for any arch standing in open air more than an hour.
- Plan several weights per leg, not one sandbag, since single weights are the most common failure.
- Use stakes only on grass or soil; decking takes sandbags because stakes damage boards.
- Under-inflate 16-inch balloons to under 10 inches outdoors to leave room for heat expansion.
- Install 3 to 6 hours before the event and keep spare balloons, a pump, clips, and fishing line for touch-ups.
Table of Contents
- Why Outdoor Balloon Arch Installation Is a Different Job
- Choosing a Frame and Weighted Base for Your Outdoor Balloon Arch
- How to Secure a Balloon Arch Outside: Anchoring by Surface
- Balloon Arch Windproof Setup Tips for Gusty Days
- Inflating and Assembling the Garland: Sizes, Colors, and Attachment
- Balloon Arch Longevity Outdoors: Heat, Sun, and Timing
- Step-by-Step Outdoor Setup and Teardown
- Ordering a Weather-Ready Outdoor Balloon Arch
- Frequently Asked Questions
Why Outdoor Balloon Arch Installation Is a Different Job
Outdoor balloon arch installation is the practice of building and anchoring a balloon arch so it survives wind, heat, and sun for the length of an event. It is not an indoor setup moved outside. According to Fun By The Yard’s 2026 event trends report, wind is the primary structural threat to large outdoor balloon installations, and even arches that look stable in still air can fail in a gust.
That is the part most guides skip. At RI Party Store, we see the difference every week: an indoor arch sits in still air, while an outdoor arch fights the weather from the moment it goes up.
Below, we walk through frame choice, anchoring by surface, windproofing, sizing, and timing, so your arch looks right when the photos start.
Choosing a Frame and Weighted Base for Your Outdoor Balloon Arch
The right outdoor balloon arch starts with a frame system and a heavy-duty base, not with balloons. Pick the frame before you pick a color scheme.
A standalone arch frame in metal or fiberglass gives you a rigid arch shape that holds under wind load. Inflated-only arches sag and lean. Our rule: if the arch will stand in open air for more than an hour, it needs a frame.
Then add weight. A weighted base keeps the frame upright when a gust hits the top of the arch. For ground setups, pair the base with stakes. For hard surfaces, sandbags or water weights do the work.
We stock a 170 g iridescent foil balloon weight that works well for smaller displays and balloon bouquets. For a full arch, plan on several weights per leg, not one.
Watch out: a single sandbag on each leg is the most common failure we hear about. Wind tips the arch, the base lifts, and the whole thing comes down mid-party.
How to Secure a Balloon Arch Outside: Anchoring by Surface
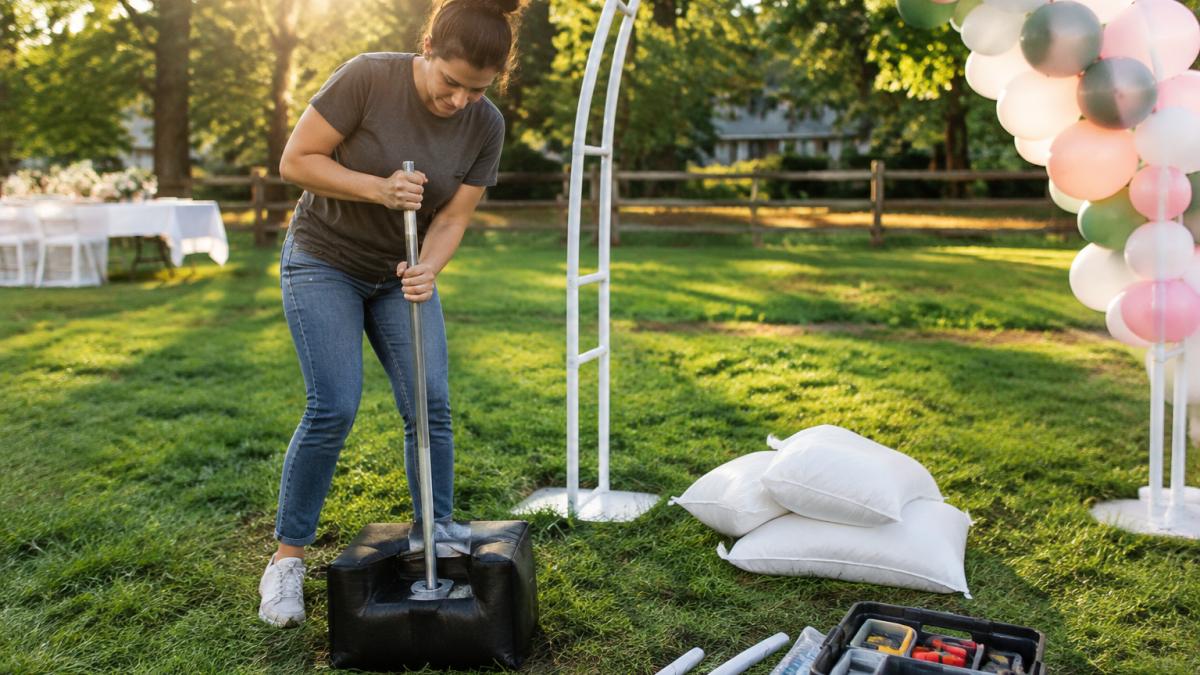
Securing a balloon arch outside means matching your anchor to the ground under it. Grass, concrete, and decking each need a different approach.
Here is how we break it down:
- Grass or soil: metal stakes driven deep at an angle, plus a weighted base for backup.
- Concrete or pavers: no stakes, so use heavy sandbags or water-filled weights on each leg.
- Decking: sandbags only, since stakes will damage the boards.
- Gravel: wide-base weights first, stakes second, because gravel holds poorly.
If you want a deeper walkthrough of each surface, our guide on how to secure outdoor balloon decor safely covers the full anchoring process step by step.
Balloon Arch Windproof Setup Tips for Gusty Days
Wind is the one outdoor variable that turns a beautiful arch into a liability, and most guides stop at “use weights.” A practical wind plan needs numbers, a decision rule, and a backup. Here is the framework we use.
Set a wind threshold before you build. Most practitioners treat sustained wind above 15 mph as the point where a large balloon arch needs full reinforcement or postponement, and gusts above 25 mph as a no-go for an unsheltered arch. Check the hourly forecast, not the daily high, afternoon gusts often peak during event photos. If the forecast shows sustained wind in the 15-25 mph range, plan for a low, wide arch with double anchoring; above 25 mph, move the arch indoors or reschedule.
Lower the profile and widen the base. A tall, narrow arch catches more wind than a wide, low one. Reduce the arch height by 1-2 feet and extend the base footprint so the legs sit wider apart. That single change cuts the leverage a gust has on the frame.
Secure every balloon, not just the frame. Loose balloons tear off the garland first and become projectiles. A 16-gram clip-n-weight keeps individual balloons from blowing away and doubles as a clip. Run fishing line through the garland and tie it back to the frame at two or three points so a single popped balloon does not open a gap.
Use a wind-response checklist. Before guests arrive, walk the arch and check: base weights still seated, stakes still tight, garland tie-downs intact, no balloon leaning past the frame edge. If sustained wind climbs above your threshold mid-event, lower the arch or dismantle the top section rather than waiting for a failure. Securing your installation against the elements provides a stable foundation for other decorative accents, such as arranging porch flowers to complement the balloon display.
Watch out: never tie a large arch to a tent leg or fence post as your only anchor. If the tent moves, the arch goes with it.
If you want a deeper walkthrough of anchoring hardware, our guide on how to secure outdoor balloon decor safely covers the full process step by step.
Inflating and Assembling the Garland: Sizes, Colors, and Attachment
Balloon sizing is where outdoor arches are won or lost. Heat makes balloons expand, so an arch that looks perfect at 9 a.m. can look stretched and shiny by 2 p.m.
According to Balloon Coach’s outdoor decor guidance, professionals use 16-inch balloons under-inflated to under 10 inches outdoors, or 11-inch balloons sized to 7 or 8 inches in direct sun. The extra room lets the balloon grow instead of popping.
For assembly:
- Inflate with an electric balloon pump for speed and even sizes.
- Tie tight knots and trim the tied ends.
- Attach balloons to a balloon strip with pre-cut holes, or use fishing line for a garland.
- Build in clusters, alternating colors for a full look.
New to garland work? Our beginner balloon garland setup guide walks through the whole build.
Balloon Arch Longevity Outdoors: Heat, Sun, and Timing
Heat and direct sun are the second-biggest threat to an outdoor arch after wind, and they work differently. Heat makes the air inside each balloon expand, so a balloon sized at 9 a.m. can look stretched and shiny by 2 p.m. UV light breaks down the latex surface, causing fading and premature popping. Wind accelerates both by drying the latex.
Size balloons for the heat, not the shade. Professionals under-inflate outdoor balloons to leave room for expansion: 16-inch balloons sized to under 10 inches, or 11-inch balloons sized to 7 or 8 inches in direct sun. The extra room lets the balloon grow instead of popping. In milder conditions, some arches hold up to two days, but direct sun is the main factor that shortens that window.
Time the install to the event, not the night before. Install 3 to 6 hours before the event so the arch is fresh through photos and the first guests. A shaded location out of direct sun can add hours to the arch’s life; a spot against a building or under a tree canopy is worth more than any spray product.
Build a heat contingency kit. Keep spare balloons, a pump, extra clips, and fishing line on hand for touch-ups. If the forecast shows a heat advisory or direct sun all afternoon, plan a shaded install and schedule a mid-event inspection to swap any balloon that looks stretched or faded.
Watch out: a balloon that looks tight and glossy in direct sun is already near its limit, swap it before it pops rather than after.
New to garland work? Our beginner balloon garland setup guide walks through the whole build.
Step-by-Step Outdoor Setup and Teardown
Here is the full sequence we recommend for a weather-ready outdoor balloon arch:
| Step | Task | Time |
|---|---|---|
| 1 | Check wind and heat forecast | 5 min |
| 2 | Set frame and weighted base | 15 min |
| 3 | Anchor by surface (stakes or sandbags) | 10 min |
| 4 | Inflate and size balloons | 30-45 min |
| 5 | Attach garland to frame | 20 min |
| 6 | Final wind check and touch-ups | 10 min |
| 7 | Teardown and deflate | 20 min |
Teardown matters as much as setup. Cut the fishing line and strip first, then pull the frame anchors, so the arch never tips toward guests. Store balloons flat and dry for reuse where possible.
Ordering a Weather-Ready Outdoor Balloon Arch
Building an outdoor arch yourself is doable, but weather-proofing takes tools, time, and a backup plan. Many decorators also undercharge for outdoor work by 30-50%, according to Balloon Builder’s 2026 pricing guide, because the engineering and failure risk are higher than indoor jobs.
That is where we come in. RI Party Store offers custom balloon arch delivery with same-day setup for birthdays, weddings, and events across Rhode Island and Southeastern Massachusetts.
You get professional setup and dependable service, backed by our friendly, customer-focused team. We also carry the supplies if you would rather build it yourself.
Frequently Asked Questions
How do you keep an outdoor balloon arch from blowing away in the wind?
Wind is the main structural threat to any outdoor balloon arch, so anchoring matters more than the balloons themselves. Use a heavy-duty base weighted with sandbags or water, and stake the frame into grass where the venue allows it. On pavement, rely on weighted bases only and keep the arch out of open corridors between buildings where gusts funnel. If sustained wind is strong or gusty, postpone installation or move the arch to a sheltered spot; no amount of anchoring makes a lightweight frame safe in high wind.
How long does a balloon arch last outside?
UV exposure from direct sun and heat are the biggest factors shortening an outdoor arch’s life, and wind shortens it further. Install 3 to 6 hours before the event so the arch looks fresh at its peak. Keep spare balloons and repair supplies on hand for popped or sagging sections, and plan teardown for right after the event rather than overnight.
What is the best way to prevent balloons from popping in the sun?
Under-inflate larger balloons so they have room to expand as the air heats up. Under-inflating balloons leaves room for them to expand as heat builds, and the right size depends on heat and direct sunlight. Place the arch in a shaded location when possible, and avoid dark-colored balloons in full sun since they absorb more heat. Inflate balloons the same day as the event rather than the night before.
Do I need a heavy-duty stand for an outdoor balloon arch?
Yes, a weighted base and sturdy frame are worth the upgrade outdoors. Indoor stands that rely on a light base can tip in a gust, while heavy-duty bases with sandbag or water weights keep the arch stable. If you are renting or buying, confirm the base is rated for outdoor use before the event day.
Your arch should be the backdrop for the photos, not the thing you worry about all afternoon. Get started with RI Party Store and let our team build and anchor a weather-ready balloon arch for your next celebration.
