
How to Choose Wedding Photo Booth Lighting That Works
Last Updated: October 31, 2026
Quick Summary
Choose photo booth lighting by starting with the venue, not the gear: check windows, ceiling height, wall color and existing fixtures before renting anything. Place a main light at a 45-degree angle about 3 to 4 feet from guests, add a fill light on the opposite side at half power, and match all lights to one color temperature.
- A ring light suits solo and couple shots, while a softbox covers groups of four or more.
- Keep guests 2 to 3 feet in front of the backdrop and light the backdrop separately so it does not go gray.
- In dark venues, use continuous lighting so guests see the glow and face it naturally.
- Split the main and fill lights across separate circuits to avoid tripping a breaker mid-reception.
- Run a 15-minute test in the real room with one person and a group of four before the event.
Table of Contents
- Start With the Venue, Not the Equipment
- Photo Booth Ring Light vs Softbox: Which One Belongs at Your Wedding
- Photo Booth Lighting Placement That Flatters Every Guest
- Photo Booth Lighting for Dark Venues and Dim Reception Halls
- How to Avoid Shadows in Photo Booth Photos
- Color Temperature, Brightness, and Skin Tones in Mixed Groups
- Power, Safety, and Venue Logistics to Confirm Before the Day
- Run a Pre-Event Lighting Test Before You Book the Booth
- Frequently Asked Questions
Start With the Venue, Not the Equipment
The right way to pick photo booth lighting starts with the room, not the gear. If you are venue-hunting in the area, this guide to planning wedding events in Fall River MA covers local options.
Lighting for a wedding photo booth is the mix of fixtures and settings that keeps faces bright and colors true while the booth takes the shot.
Here is what to check first:
- Windows: Direct sun creates hot spots and glare. Afternoon sun shifts fast.
- Ceiling height: Low ceilings bounce light back down. High ceilings swallow it.
- Wall color: Dark walls absorb light. White walls bounce it everywhere.
A 150-guest wedding in a large hall needs more light power than a 40-person backyard party. Scale your plan to the room and the crowd.
Photo Booth Ring Light vs Softbox: Which One Belongs at Your Wedding
A ring light is best for solo and couple shots, while a softbox wins for group photos and mixed skin tones.
A ring light is a circular light that sits around the camera lens.
A softbox is a light modifier that spreads a broad, soft beam through a diffused panel.
Here is how they compare:
| Feature | Ring Light | Softbox |
|---|---|---|
| Best for | Solo, couple shots | Groups of 4+ |
| Coverage | Narrow | Wide |
| Shadow control | Flat, even | Soft, gradual |
| Setup footprint | Small | Larger |
| Skin tone result | Good | Better in mixed groups |
Many booths pair a ring light with a second light for balance.
Photo Booth Lighting Placement That Flatters Every Guest
Place your main light at a 45-degree angle to the guest’s face, about 3 to 4 feet away, and add a fill light on the opposite side at roughly half the main light’s power. If you are building the booth yourself, see this guide on how to set up an inflatable photo booth. This angle lights the face without flattening it and keeps shadows from cutting across the eyes. The geometry matters: at 45 degrees, the light wraps around the cheekbone and nose instead of hitting them head-on, which is why faces read as three-dimensional rather than pasted flat.
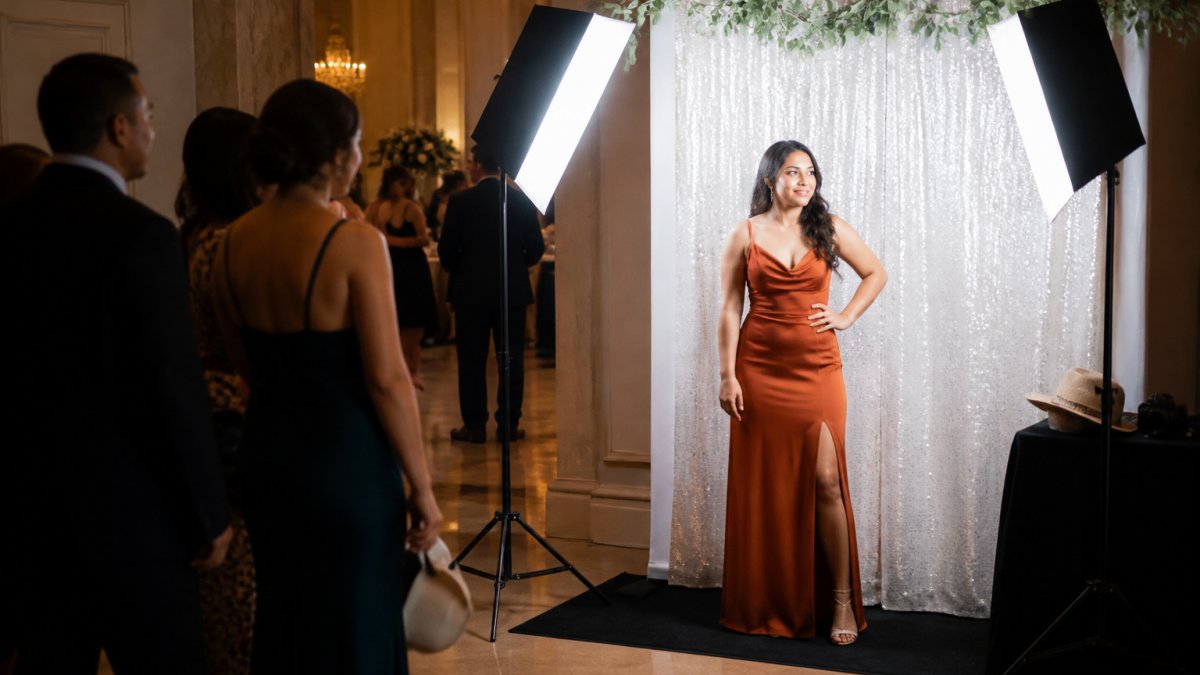
Properly balanced illumination ensures that even the most intricate wedding photo booth props remain clearly defined and visually engaging within every captured frame.
Think of the setup as a triangle: camera at the apex, main light and fill light at the two base corners. Here are some general starting distances across booth styles:
| Element | Starting Distance | Angle | Notes |
|---|---|---|---|
| Main light to guest | 3-4 ft | 45° off camera axis, slightly above eye level | Closer = harder shadows; farther = softer but dimmer |
| Fill light to guest | 4-5 ft | 45° opposite side, at or below eye level | Half the main light’s power |
| Backdrop to guest | 2-3 ft | , | Too close casts guest shadow on backdrop; too far goes gray |
| Camera to guest | 4-6 ft | Straight on | Wider framing for groups |
| Backdrop light to backdrop | 3-4 ft | 45° from each side | Light the backdrop separately so it does not go gray |
Follow these placement rules:
- Main light: 45 degrees to one side, slightly above eye level. Aim at the forehead, not the chin.
- Fill light: opposite side, half power, at or below eye level to soften shadows under the eyes and nose.
- Distance: keep lights 3 to 4 feet from guests for soft, even coverage. For groups of four or more, push the main light to 5 feet and raise power to compensate.
- Backdrop: light it separately with its own fixture so it does not go gray. Keep guests 2 to 3 feet in front of it.
- Height: aim lights at the face, not the floor. A light aimed too low throws shadows upward and hollows the eyes.
For a dark venue, move the main light closer (2 to 3 feet) and raise power. For a bright hall, pull lights back to 5 feet and lower brightness. The 45-degree angle stays the same; only distance and power change. Test the angle with a real person before the event, not after.
If you only have one light, place it at 45 degrees and add a white foam board or reflector on the opposite side at the same distance. It bounces fill light back onto the shadow side for a fraction of the cost of a second fixture.
Photo Booth Lighting for Dark Venues and Dim Reception Halls
Dim reception halls need more light power and a wider aperture, not just brighter bulbs. When the room goes dark for dancing, your booth has to light itself.
The right setup depends on the venue conditions you are walking into. Treat these as starting points, then test in the actual room:
| Venue Condition | Typical Ambient Light | Main Light Strategy | White Balance | Watch Out For |
|---|---|---|---|---|
| Daylight hall with windows | Bright, shifting | Pull lights back to 5 ft, lower power; use fill to balance window glare | 5500K-5600K | Afternoon sun shifts fast; hot spots on one side of faces |
| Tungsten-lit ballroom | Warm, dim | Raise power on both lights; match booth lights to 3200K | 3200K | Orange cast on skin if booth lights are daylight-balanced |
| Outdoor reception at dusk | Falling fast | Continuous lights at higher power; keep backdrop close | 4500K-5500K, recheck as sun drops | Color temperature changes minute by minute |
| Very dark venue (dancing) | Near black | Dual lights at high power, main light 2-3 ft from guests | Match booth lights to each other, not the room | Washed-out skin if power is pushed too high |
For dark venues, do this:
- Raise light intensity on both main and fill lights in small steps, checking a test shot after each bump.
- Use continuous lighting so guests see the glow and face it. Flash leaves guests guessing where to look.
- Open the aperture to let in more light without blur. A wider aperture also narrows depth of field, so keep groups on the same plane.
A low-light venue is any room where ambient light is too weak for a clean exposure. The fix is more controlled light, not a longer shutter that blurs motion. If the room is very dark, a dual-light setup with both lights at higher power covers the gap.
Continuous lights at high power can trip a breaker mid-reception. Split the main and fill lights across separate circuits and confirm the venue’s circuit load before the event. If the room goes fully dark for dancing, keep a small battery-powered fill light as backup.
The venue condition, not the equipment, decides the plan. Match color temperature to the dominant ambient source, scale power to how dark the room goes, and test in the actual space at the actual hour, a ballroom that is bright at 5 p.m. may be near black by 9 p.m.
How to Avoid Shadows in Photo Booth Photos
Shadows come from one hard light source hitting a subject at a steep angle. The cure is a second light, softer diffusion, and enough distance. Here is how to kill the shadows that ruin group shots.
Use these fixes:
- Add a fill light on the opposite side of the main light.
- Diffuse both lights with a soft panel or umbrella.
- Move lights back so the beam spreads and softens.
Glare and glasses are a related problem. Angle lights higher and to the side so they do not bounce straight off lenses. For reflective backdrops, move lights off-axis.
Color Temperature, Brightness, and Skin Tones in Mixed Groups
Set every light to the same color temperature, usually around 3200K to 5600K, and match your camera’s white balance to it.
Color temperature is the warmth or coolness of light, measured in Kelvin. Tungsten bulbs run warm, near 3200K. Daylight runs cool, near 5600K.
Do this to keep skin tones true:
- Match all lights to one Kelvin value.
- Set white balance to match that value, or use auto and check.
- Keep brightness even across the group with a fill light.
Skin-tone-inclusive lighting means soft, even light from two directions. Hard single-source light deepens shadows on darker skin and blows out lighter skin. A dual-light setup with diffusion fixes both.
Power, Safety, and Venue Logistics to Confirm Before the Day
Confirm power outlets, circuit load, and cord placement before the event, not on the day. Lighting safety and venue logistics sink more setups than bad gear.
Build a pre-event checklist:
- Confirm outlet locations and count
- Check circuit load with the venue
- Bring extension cords and gaffer tape
Watch out: overloading one circuit with multiple lights can trip a breaker mid-reception. Split lights across circuits and keep cords out of guest paths. For a rundown of essential party rental equipment for weddings and how to choose vendors, see this guide.
Run a Pre-Event Lighting Test Before You Book the Booth
Test the full lighting setup in the actual room before you commit. A 15-minute test in the real space beats any online guide. Bring a friend, take test shots, and check exposure, color, and shadows.
Run this test:
- Set up the booth and lights in the real spot.
- Take test shots of one person, then a group of four.
- Check exposure so faces are bright, not blown out.
- Check white balance so skin looks natural.
- Review shadows and glare, especially with glasses.
- Adjust power and angle, then shoot again.
Picking the right lighting takes a little planning, but the payoff is a full night of crisp, vibrant photos your guests actually keep. RI Party Store offers party supplies, balloon décor, and event rentals under one roof, with in-store pickup and delivery options across Rhode Island and Southeastern Massachusetts.
Frequently Asked Questions
What lighting is best for a wedding photo booth?
Soft, diffused continuous lighting placed at roughly 45 degrees to each side of the camera gives the most flattering results for wedding guests. A ring light works well for tight head-and-shoulders shots, while a softbox or dual soft panels handle groups of three or more without flattening faces. Match the light’s color temperature to the room, usually around 3200K for warm reception halls and 5600K for daylight or LED-white ballrooms, so skin tones stay natural instead of orange or blue.
Is a ring light or softbox better for a photo booth?
A ring light is compact, easy to mount around the camera lens, and gives even, shadow-free light for single subjects, which is why it suits enclosed booths and tight setups. A softbox spreads light across a wider area and is better for open-air booths where two or three guests stand shoulder to shoulder. Many wedding setups use both: a ring light at the lens for catchlights and a softbox or second panel as fill. Test both at your venue before committing.
How do you avoid harsh shadows in photo booth pictures?
Place two lights on opposite sides of the camera at about 45 degrees rather than one light straight on, and raise them slightly above eye level so shadows fall down and behind rather than across the face. Diffusion softens edges, and keeping guests at least 3 feet from the backdrop prevents hard shadow outlines on the wall. If you see dark circles under eyes or a shadow from a nose, lower the light power or move the panel farther back.
Do photo booths need extra lighting at a wedding?
Usually yes. Most reception halls dim the lights for dinner and dancing, and a booth relying on ambient light alone produces grainy, blurry photos. Adding two continuous lights or a ring light keeps exposure steady as the room darkens. Confirm with the venue whether you can tap into their power, whether dimmers will be adjusted during the night, and whether any uplighting will cast a color cast on your backdrop so you can white-balance accordingly.
